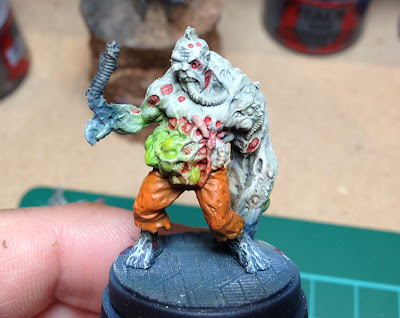
Unfortunately, I do not have as many photos of the actual painting progress, but often I find it that people are more interested in the steps required. The Strain are also more "organic" models - there is no exactly rules for which colors to apply where in the same way as the Vanguards. You just have to make them look cool and scary!
Some models are easier to paint unassembled. Pin the pieces to some wire if you wish to paint them separably.
Most of the initial steps I did with my airbrush to save time and because I just love using it. You will be able to get the same result with a normal brush though.
Skin
1.
Undercoat the model black. I used Vallejo Black Surface Primer with an airbrush. Any black primer is fine.2.
Base the skin (remember the feet!) with a dark color. It really depends on your taste. For example dark brown, dark green, dark red and dark purple.
You can also choose two base colors (or more!) and let them blend into each other.
I painted all the skin Badger Minitaire Saddle Brown and the hands and feet with a grey blue mix of Minitaire Badger Fur and Minitaire Nautilus Blue.
3.
Begin to highlight the skin with a lighter color. Depending on your base color, you should try to find one that suit it. As this is the first highlight, be careful not to choose a too light color.
The Strain models have a lot of texture so just drybrush the highlight on carefully.
I used Badger Minitaire Mummy sprayed from 45 degrees. The hands and feet where highlighted with the mix from before added Ancient Bone into.
4.
We need a final highlight. Take an even brighter color and drybrush it on even lighter than before.
I used Minitaire Ancient Bone.
OPTIONAL STEP
The new Badger Minitaire Airbrush paint line have some nice Ghost Tints. I used some Oil Discharge and Purple under the arms to emphasize the shadows more.
Wounds, blister and trousers
5.Time to some details. All the revealed muscle tissue and other wounds were painted with GW Bloodletter Glaze. It gives them a nice red tint.
6.
The blisters can have any color you like - I went for the green/yellow color tone. I tried purple on one of the models but did not really like it that much.
I based them with Badger Minitaire Gremlin Green mixed with Minitaire Bile and mixed in more Bile as a final highlight.
 |
| Your model should look like this now |
The color of the trouser is really up to you and how you want the Strain models to look. Most of them are probably prisoners so a classic orange jumpsuit color suited me fine.
Base the trousers dark brown. I used Badger Minitaire Saddle Brown.
8.
Paint the trousers with an orange color. I like a saturated one so I used Minitaire Craven and GW Troll Slayer Orange. Make sure that the dark brown are still visible in the recesses. The orange will need several layers so make sure to use THIN coats!
 |
| Ready for wash! |
Wash
You can either use normal GW Washes - or try something else: Oil Wash!
New to Oil Washes? Watch a video here.
9.
Apply Gloss varnish to the whole model. I used Minitaire Gloss Coat with my airbrush. This coat will make the wash flow better. Even if you decide not to use an Oil Wash, I would still recommend the varnish in this case.
10.
Apply a brown wash all over the model. I used W&N Winton Vandyke Brown.
You could use GW Devlan Mud instead if you prefer.
You could use GW Devlan Mud instead if you prefer.
11.
When the wash is dry - it is time to clean the model. The wash will often tint areas you do not want it to.
Use the same solvent you used to make the oil wash. Use a cotton swab and remove the dried wash from any areas it should not be. Especially the raised areas of the trousers should be cleaned!
If you used normal GW wash and applied varnish beneath - you actually have the option of cleaning it off with Isopropyl Alcohol and a Cotton Swab. The alcohol will eat the varnish so you have to be gently and quick. If you rub too much, you will begin to remove paint beneath the varnish.
Paint the metal and tubes with GW Boltgun Metal / GW Leadbelcher.
13.
Wash the metal parts with GW black shade (Nuln Oil). You should also apply some black shade in the eye sockets and in the neck area to darken it.
14.
Highlight the metal parts with GW Chainmail / Runefang Steel.
15.
Highlight the trousers with the orange base color mixed with a little yellow.
16.
I picked out one of the veins in front of one of the model with GW Guilliman Blue glaze. It made it stand out.
17.
Paint the teeth and eyes white with a fine brush.
Details
12.Paint the metal and tubes with GW Boltgun Metal / GW Leadbelcher.
13.
Wash the metal parts with GW black shade (Nuln Oil). You should also apply some black shade in the eye sockets and in the neck area to darken it.
14.
Highlight the metal parts with GW Chainmail / Runefang Steel.
15.
Highlight the trousers with the orange base color mixed with a little yellow.
16.
I picked out one of the veins in front of one of the model with GW Guilliman Blue glaze. It made it stand out.
17.
Paint the teeth and eyes white with a fine brush.
Stay tuned for a tutorial on Strain Phase 2!


I know this is an Old thread, but do Citadel and Army Painter work just as good for these minis?
ReplyDeleteThere isn't any Vallejo Miniature paints in my area.