

I have painted several Vanguard Samaritans and after some trial and error - Finally I have a recipe that suits my taste.
Undercoat the model gray or white with your favorite primer. I used Vallejo Grey Surface Primer with an airbrush.
All of the paints I have used are from Games Workshop. Feel free to use any brand you like.
The model was painted in 2 parts to make the process easier. I pinned the arm/weapon to some wire. After painting everything was glued.
1.

Base the whole model with Celesta Grey. Remember thin layers here.
(OPTIONAL) If you are using an airbrush and want to save some time later, spray Ulthuan Grey directly from above to better see where to apply more highlights later.
2.
Wash the whole model with a mix of Lahmian Medium, Nuln Oil and Drakenhof Nightshade. Use the medium to keep the wash thin and prevent a too dark result. You can experiment with the right ratio of blue and black. I used about 1:1.
Wash the whole model with a mix of Lahmian Medium, Nuln Oil and Drakenhof Nightshade. Use the medium to keep the wash thin and prevent a too dark result. You can experiment with the right ratio of blue and black. I used about 1:1.
3.
Paint the "undersuit" with a mix of watered down Abaddon Black and The Fang. If you have enough water in the mix, the raised areas will automatically be highlighted. If you apply too much water here, you will lose control of the paint more easily.
Do not worry about mistakes here, you can paint them over later in step 5 if you make some.
4.
Highlight the "undersuit" with Dawnstone. Be careful here, you only need to paint the raised areas.
 5.
5.
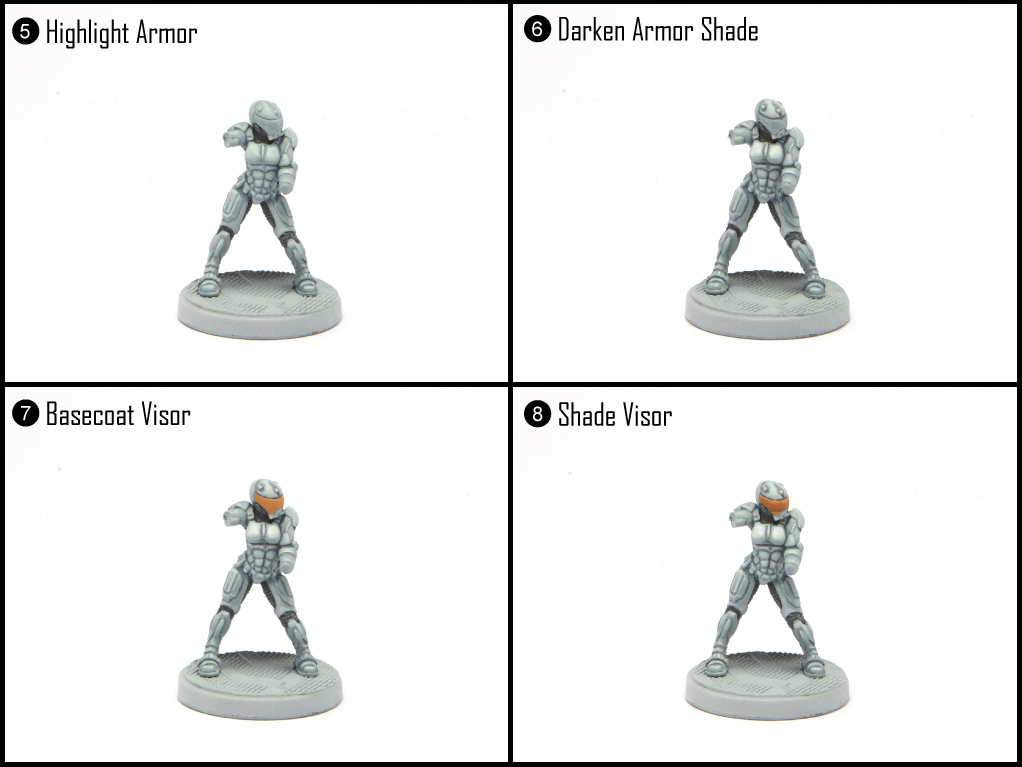
Highlight the armor first with Celesta Grey and then gradually towards pure Ulthuan Grey.
Imagine the light coming from above the miniature when you decide where to place your highlights.
6.
A watered down mix of The Fang and Abaddon Black was applied in recessed areas. This will improve the contrast between shadows and highlights on the armor.
7.
Paint the entire visor with a mix of Troll Slayer Orange and Jokaero Orange.
8.
Paint a line of thinned down Mournfang Brown at the lower portion of the visor. Blend this line as good as you can towards the top of the visor. You can do this with several thin coats. Mix in Lahmian Medium to help with the blending.
 9.
9.
Mix some Averland Sunset into the previous mix from step 7 and blend it in at the top of the visor to brighten the effect made in step 8.
10.
A thin line of Averland Sunset mixed with White Scar is painted at the top of the visor. A very thin wash of this is also painted below the line to smoothen it together with step 8.
11.
Highlight the line from step 10 with a even finer line with more White Scar added. This mix should also be applied at the bottom of the visor and as a line in the middle. This will give the impression of reflections.
12.
Paint the weapon black. Several thin coats is probably required to get an even coverage.
 13.
13.
Paint the entire charge stripe with Warpstone Glow. Paint small dots with Moot Green and highlight them with a mix of Moot Green and Yriel Yellow.
14.
Paint the weapon black with a dark mix of Abaddon Black and Mechanicus Standard Grey. You can paint over any splatter you have made in step 13. Leave pure Abaddon Black in the recesses.
15.
Highlight the weapon with Mechanicus Standard Grey and the Dawnstone.
16.
Paint the gloves with Rhinox Hide followed by highlights of Gorthor Brown and Steel Legion Drab.
I hope you like the finished results!
If you want, you can modify the armor colors and the wash to make the whole model lighter/darker or more blueish/grayish - it is entirely up to you.
I have not decided how I want the bases, so I have left them black for now.
Please comment with your thoughts about this tutorial :-)
Highlight the "undersuit" with Dawnstone. Be careful here, you only need to paint the raised areas.
Highlight the armor first with Celesta Grey and then gradually towards pure Ulthuan Grey.
Imagine the light coming from above the miniature when you decide where to place your highlights.
6.
A watered down mix of The Fang and Abaddon Black was applied in recessed areas. This will improve the contrast between shadows and highlights on the armor.
7.
Paint the entire visor with a mix of Troll Slayer Orange and Jokaero Orange.
8.
Paint a line of thinned down Mournfang Brown at the lower portion of the visor. Blend this line as good as you can towards the top of the visor. You can do this with several thin coats. Mix in Lahmian Medium to help with the blending.
Mix some Averland Sunset into the previous mix from step 7 and blend it in at the top of the visor to brighten the effect made in step 8.
10.
A thin line of Averland Sunset mixed with White Scar is painted at the top of the visor. A very thin wash of this is also painted below the line to smoothen it together with step 8.
11.
Highlight the line from step 10 with a even finer line with more White Scar added. This mix should also be applied at the bottom of the visor and as a line in the middle. This will give the impression of reflections.
12.
Paint the weapon black. Several thin coats is probably required to get an even coverage.
Paint the entire charge stripe with Warpstone Glow. Paint small dots with Moot Green and highlight them with a mix of Moot Green and Yriel Yellow.
14.
Paint the weapon black with a dark mix of Abaddon Black and Mechanicus Standard Grey. You can paint over any splatter you have made in step 13. Leave pure Abaddon Black in the recesses.
15.
Highlight the weapon with Mechanicus Standard Grey and the Dawnstone.
16.
Paint the gloves with Rhinox Hide followed by highlights of Gorthor Brown and Steel Legion Drab.
I hope you like the finished results!
If you want, you can modify the armor colors and the wash to make the whole model lighter/darker or more blueish/grayish - it is entirely up to you.
I have not decided how I want the bases, so I have left them black for now.
Please comment with your thoughts about this tutorial :-)
I really like the method you went through, and the style of doing the step by step. Very Tale of painters like ;) The end result is quite nice though and you will have one heck of a nice game once everything is painted up like this!
ReplyDeleteI can copy that. Looks really cool! And a tip to my hat for fitting that arms so nicely. After I tried to fit mine (for seperate painting) and failed utterly, I gave up and simply painted them in one piece.
ReplyDeleteYeah it really helps fitting the arm as the last step. I mounted the arm on a paper clip. It made it much easier :)
DeleteThanks for writing this - converted most of the colors to Army Painter paints.
ReplyDeleteI look forward to additional tutorials from you
What can I say. Just really really cool!!!
ReplyDeleteMove of this plz :)
Many great ideas here. Very helpful when painting my own Vanguards.
ReplyDeleteFantastic tutorial! Love the step-by-step images. Blog bookmarked!
ReplyDelete